Thứ Sáu, 7 tháng 8, 2015

Romanian Chicken Papricas... chicken with tomato sauce and dumplings. It's been awhile since I've posted, I hope you are all doing well. A big thanks to you all who still try out recipes and share your feedback. I really appreciate your kind words and taking the time to stop by...

Summer has been busy and time has flown by so quickly! I've been meaning to post an amazing ice scream recipe that I made throughout the summer, a recipe that would be appropriate for these warmer months. Somehow I haven't had the chance to make it again so I could take pictures... I'm hoping I can still find my camera, and that it still works:). Truthfully, I have not been cooking or baking much... just haven't had the drive to try out new recipes lately (well, except for the ice scream recipe  that made me go out and buy the ingredients). We've somehow resorted to eating simple meals, and have to say we kind of got into the habit of pulling out whatever is in the fridge or pantry and calling it a meal.... of course always adding some vegetables on the table:).

However, from time to time(guests being in town), I've been able pull out my recipe index and make some of the traditional Romanian dishes...  I've had this recipe in my draft folder for some time now and thought to post it. It brought wonderful memories for me, as I loved papricas growing up... 

The dish is simple to make... doesn't have complex flavors... but it is still quite delicious and comforting. Romanian sauces are always quite similar, and this sauce isn't much different from the tomato based sauces found in Romanian cooking. However, the dumplings add another dimension to the dish and make it that much more comforting:). Hope you enjoy...

You will need:

1.5-2 lbs chicken meat, cut in 2 inch pieces (I used 2 boneless things, 2 drumsticks, 2 breast pieces)
2 TBS oil
1 onion (1 1/2 cups dice)
2  crushed garlic cloves, optional- I rather like it without
2 TBS tomato paste
2 tsps paprika
3-4 cups chicken stock
2 bay leaves
salt and pepper to taste
lemon juice to taste
chopped parsley, as needed

Dumpling Batter:
2 eggs(113grams), beaten
7 TBS (67 grams) flour
pinch of salt

Directions:
1. Cut up chicken pieces and season with salt and pepper. Set aside.
2. Make dumpling batter: 
Beat eggs, add flour and pinch of salt. Whisk ingredients together until combined. Set aside. 
   
3. Heat large skillet on medium heat. Add oil.
4. When oil is hot add chicken pieces in single layer. Allow meat to brown before turning. 
5. Turn chicken pieces over and cook until meat is 3/4 of the way cooked. This should take about 5-7 minutes.
6. Lower heat to medium/low and add onion to pan. 
7. Stir and scrape any browned bits and continue cooking onion and meat for about 10-15 minutes on medium low heat. 
8. Add crushed garlic cloves(if using), tomato paste and paprika. Stir to combine thoroughly and cook for an additional 1-2  minutes. You can remove the pan from the heat so you can combine the ingredients easier without risking burning the meat and onion... and then just place it back on the heat to continue cooking. 
9. Off heat, add 3-4 cups of chicken stock slowly and stir to combine(amount of stock depends how thin you want the sauce to be...start with smaller amount and adjust later, if you feel it needs it.)
10. Place skillet back on heat and add bay leaves.
11. Heat on high and bring sauce to a boil, then lower heat  to a soft boil(med/low heat) and cook for an additional 10-15 minutes or until sauce is thickened slightly.  
12. Lower heat to low and make sure there are no boiling bubbles occurring, then slowly place teaspoon sized dumpling batter in sauce ... allow batter to slowly fall from the teaspoon in the sauce. Keep the teaspoon close to the sauce when forming dumplings... otherwise the dumplings will disintegrate if formed and dropped from a distance. 
Tip: It helps to dip spoon in the hot liquid sauce before forming dumplings as this makes it easier for the dumpling to release from the spoon.
13. Continue forming dumplings until all batter is used up. Allow to cook until slightly puffed and soft.... about 10-15 more minutes or until dumplings are cooked through. 
14. Add lemon juice to taste and adjust seasoning. Lemon juice can be optional, but I find it brightens the dish well, bringing out the flavors. Cook for an additional minute or so. Sprinkle with parsley.

Thứ Sáu, 23 tháng 1, 2015


Pollo Relleno... Poblano Chile Stuffed Chicken with Pepper Jack Cheese and a Cornmeal Crust. I felt the need to add a savory dish amongst all the sweets I've been posting lately. Maybe it's not been so "lately"... but rather more like last year:).  In any case, I hope you have all been doing well and enjoying the new year. 

I thought to stop by for a bit to share a savory dish... to give us all a little break from all the sugar in the previous posts:).

So recently I ran across a written recipe I had stashed away in a drawer, in one of my notebooks. There I keep bits and pieces of paper with all sorts of written recipes... recipes that I have kept over the years. So while looking through the papers, I found a recipe that sounded so delicious and different, that I instantly knew I was going to make it. Kept wondering why I 'd never made it before... and it didn't take long before I did make it. And then, I made it again:)...

I went ahead and changed some things with the original recipe... like roasting my own chiles and adding my own seasonings rather than using canned chiles or using prepared taco seasoning . But if you are in a hurry, or if you want to simplify the recipe, opt to use canned whole chiles and add about 2-3 teaspoons taco seasoning to the cornmeal.  

You know, we loved this variation to the usual stuffed chicken breasts. Just loved it! I'll admit, I wasn't exactly sure how the cornmeal crust would play out in the final taste, but it pleasantly surprised me. Sort of reminded me of the southern fried okra, or cornmeal battered catfish. I don't know what it was, but we loved the flavor of the pollo relleno...  the overall flavor was mild enough and not overpowering in any herb or spice. Oh, and it's baked and not fried. Always, always a plus:).

What I really liked about this dish, is that you can make as many or as few chicken rolls as you need. You can even slice the roll and use it as an appetizer. It works wonderfully well with a red chile sauce or salsa of sorts. I love paring it  with a simple oil and vinegar seasoned cabbage salad.... but you can serve it with other side dishes... macaroni and cheese, mashed potatoes or spanish rice. All work well. Just click on the links above if you are interested in the cabbage salad or red chile sauce ... it will take you to the recipe directly without having to search through the recipe index:). 

The nice part is that the rolls are gluten-free, so if you are looking for a dinner-party-sort-of dish to make for the gluten-intolerant guest, these chicken rolls work wonderfully well. And if you are on a search, looking for different ways to cook chicken breast, well, you may want to try this recipe. Different and definitely not boring:). 

I must mention that the cornmeal should be of a fine grind, not coarse...don't want to have it taste too gritty:). The finer the cornmeal the better texture in the overall product. Also, of you really don't like the green poblano pepper taste, I don't see why you couldn't substitute it with a red roasted bell pepper. And if you don't like to use corn, opt for using some ground up almonds as an alternative. Of course, all theses changes  would taste a bit different, but the idea is to make something you like:). 

So here is another variation to the ever-so-popular chicken cordon bleu recipe I posted a few years back. Hope you enjoy...

Note: Can assemble rolls ahead a few hours... say, in the AM and bake later for dinner. Also, roasted chiles freeze well, so make extra for another day.

Tip: While rolling the chicken and battering it up in the egg and cornmeal can be a bit messy, the overall product sort of falls into place as it bakes. 
Feel free to use a toothpick to hold the chicken roll in place before dipping in egg and cornmeal. Allowing the dipped rolls to rest in the fridge for an hour or so will firm up the chicken and minimize the cheese from oozing out too much.
Also, feel free to use a stick of cheese rather than a slice of cheese for easier rolling... but I personally like the cheese to be spread out a bit.

Tip 2: I have made these also with the addition of a  thin slice of smoked turkey as well... along with the green chile and cheese. Went rather well...

You will need:

2 skinless, boneless chicken breast halves, (cut in 4 equal pieces)
salt and pepper to taste

Cornmeal crust seasoning:
1/3 cup cornmeal, fine grind
1 tsp ground onion powder
1/2 tsp dried oregano
1/4 tsp cumin powder
1/4 tsp chipotle powder, can use smoked/regular paprika if needed
couple of pinches of kosher salt, or to taste

Egg wash:
1 egg

Roasted Poblano Chile:
2 whole poblano chiles, roasted, skinned, seeded and cut in half lengthwise (or you can use canned whole green chili peppers)
salt and pepper to taste
drizzle of olive oil

Cheese Filling:
4 slices Monterey Jack cheese

Directions

Roast Poblano Chile:
1. Wash poblano chiles and dry. 
2. Place chiles in a broiler pan and broil until skin is blackened and blistered. 
3. Turn over and do the same to the second side of the chile. I usually do this in my toaster oven for about 10-15 minutes on each side. Time is approximate, just check to see when poblanos are blistering and getting that dark skin. 
4. Allow roasted poblanos to cool, then peel  and take out seeds along with the core. Season lightly with salt and pepper and a drizzle of olive oil. Cut in half lengthwise and set aside.  

5. Cut each chicken breast half in 2 equal pieces lengthwise...you should have a total of 4 thin chicken breasts. Season with salt and pepper.
6. Place each thin chicken breast half between 2 pieces of plastic wrap. Or you can place chicken breast inside a large ziploc bag.
7. Pound chicken lightly into a rough rectangle about 1/8 inch thick.... being careful not to pound too hard so as too tear the chicken. Remove plastic wrap.
8. In a bowl combine cornmeal and seasonings. Mix to combine. If your cornmeal is  a bit coarse, opt to run it through a blender to make it finer.... what I ended up doing.

9. Place egg in another bowl; beat lightly.
10. Assemble chicken rolls: Place a chili pepper half on  pounded chicken piece. Place a slice of cheese atop chili pepper. You can also use a cheese stick if you prefer and place it near an edge. Fold in sides and roll up jelly-roll style....and secure with toothpicks as needed. Now, I didn't fold my sides and therefore had a bit of the cheese ooze out. This is normal.
11. Dip rolls into egg and coat with cornmeal mixture. 
12. Place rolls, seam sides down, on a baking sheet pan.... I like to place them in the fridge to firm up before baking... for an hour or so. 
13. Bake, uncovered, in a 375 degree F oven for 25 to 30 minutes, or until chicken is cooked through.  I love baking the rolls in my toaster oven. Some of the cheese will ooze out, but I like to allow the cheese to firm up a bit as the rolls cool for about 5 minutes on the baking sheet... I then stuff the cheese back in the sides:). You can use a cheese that doesn't melt so easily... a hard cheddar.
Note: Now, I like to make these rolls in advance and place them in the fridge to firm up before baking... baking time might increase a bit. But I rather like the ability to prepare them in advance.

Thứ Năm, 25 tháng 9, 2014

Crispy Baked Chicken Wings(II)... using baking powder. So here is the second recipe I promised to share awhile back... where you can bake up some delicious crispy chicken wings. No frying involved. 

This method involves using baking powder to crisp up the chicken skin. It's all science, but the result is fantastic. In a nut shell, the baking powder draws out the moisture, breaks down the protein and helps the meat brown. All this gives you the crispiness we enjoy from fried wings... but without actually frying. The method works... and makes for some wonderful hot wings!

I first came across this method a year or two ago but finally managed to make it recently. While the method used only 3 ingredients (chicken wings, baking powder and salt) , I managed to add my own personal touch... adding a bit of pepper and potato starch to further reduce moisture. This is the recipe I'm sharing today, but feel free to skip the potato starch. It works without it. 

I ended up looking at a couple of recipes and decided to combine them...  used the lower amount of baking powder found in one recipe and applied the baking technique of the other recipe. And in the end I managed to make my own version and liked the result.  

For this batch I simply went the traditional route... glazing them with hot sauce and butter:). Hope you enjoy... 

Note: While I posted 2 different temperatures(Cook's Country version), I've also done these wings at 450 deg F as well, with wings having an overnight rest in the fridge uncovered. Baking time will vary, but they bake up nice and crisp by 40-50 minutes or so... Either way you choose, the result will be crispy wings:). 

You will need: inspired by SeriousEats and Cook's Country.

3.5 lbs chicken wings( 12 whole wings= 12 flats+12 drumettes)
1 tsp kosher salt
1 TBS baking powder
1 TBS potato starch(can be optional)
black pepper to taste

Hot Sauce:
3 TBS butter, melted
1/3 cup Franks hot sauce

Directions:
1. Cut up chicken pieces into flats, drumettes, and wing tips. Reserve tips for stock by freezing them.
2. Mix salt, baking powder, potato starch and pepper in small bowl. 
3. With a paper towel blot chicken pieces from excess moisture.
4. Sprinkle baking powder mix all over wings, coating evenly. 
5. Line a tray with parchment paper and place wings in single layer without overlapping.(alternately place wings on a rack and then place them on a baking tray.
6. Place wings in fridge for several hours... this helps the wings dry up further. I placed mine in the fridge in the morning and baked in the evening... about 8 hours later. 

  • Preheat oven to 275 deg F
1. Combine melted butter and hot sauce. Set aside until needed.
2.. Bake wings for 20 minutes at 275 deg F, then increase heat to 425 deg F and continue cooking for another 45-50 minutes, or until wings are nicely browned and crispy. 
Note: If you feel the wings aren't browned enough, increase heat to 450 Deg F the last 10 minutes of baking.
3. Remove wings from oven and place in a large bowl. Drizzle hot sauce over wings and toss to coat. Serve immediately. 


Thứ Tư, 10 tháng 9, 2014

Crispy Parboiled Baked Chicken Wings... with Korean Sauce and Bonus Chicken Stock. Because I don't buy ready made chicken stock, I'm always on the "alert" when it comes to meat bones. I try not to toss them out when I'm de-boning. Funny thing is that sometimes I buy bone-in meat, just for the sole purpose of using the bones to have homemade chicken stock on hand. 

Now the other day, I was really craving some wings.... mainly because I had seen a recipe for a Korean sauce that I wanted to make. I thought it would be good to glaze the chicken wings with a different sort of sauce... something outside the usual hot sauce or BBQ sauce I tend to glaze the wings with. In any case, I ended up buying some wings to bake.

I love baking the wings and always skip the frying. But some time ago I had come across Alton Brown's steaming method... a method that promised crispy wings without frying.  I was willing to give it a go. It would be worth a try... 

But as I was fiddling around trying to find something to steam the wings in, I thought, why not parboil the wings instead. It'd be much simpler ... and this way I could make use of the flavorful liquid to make a stock. Oh, and I'd use up those little wing tips to their full potential, because I sure didn't want to throw them away:)!  Plus, I'd also use up those bits and pieces of vegetables I had sitting in the fridge. And that's what I ended up doing. Sort of went my own way with the recipe:)...

These parboiled wings tend to be a bit more drier than normal ... just because most of the fat is rendered in the boiling and baking process. However, they do have a nice crisp exterior. The Korean red pepper sauce worked wonderfully well with the wings. I lightly coated the wings, but it gave them the needed moisture as well as imparting a ton of flavor. A little bit of spice...  a little bit of sweet. 

My husband loved these wings, so I'm planning on making them again this way ... especially since I get the bonus chicken stock in the process. Always, always good to have some homemade chicken stock on hand. 

I made 2 versions of baked crispy wings. This was part 1....next time I'll share the second method. Hope you enjoy...

Note: The Korean red pepper sauce is so versatile... use it in all sorts of stir-fries or add it to ground meat for lettuce wraps, glaze meatballs, etc. 
Since I had some leftover sauce, I ended up using it as a stir-fry sauce for vegetables... it worked wonderfully well with the snap peas and zucchini I picked from my garden, but you can use other veggies of choice. 

You will need:

26 whole wings(about 3lbs), separated in 3 pieces( flats, drumettes, wing tips)
1 TBS kosher salt
1 large garlic clove, sliced
6 cups water

Bonus Chicken Stock
parboiled liquid from above
parboiled wing tips only
1/2 parsnip
1 large carrot
1-2 ribs of celery
1 small onion
1 cup extra water

Korean Gochujang Sauce adapted from Maanghci
2 garlic cloves, minced
1 TBS oil
1/3 cup ketchup
1/4 cup brown rice syrup(now, I haven't used honey, but it should work)
1/4 cup hot pepper paste(gochujang)
1 TBS cider apple vinegar
toasted sesame seeds

Other Sauce of Choice
BBQ sauce 
Hot sauce 
Honey mustard

Directions:

Parboil Chicken Wings:
1. In a large soup pot, bring 6 cups of water to a boil.
2. Add all wing pieces, sliced garlic and salt.
 
3. Boil chicken wings for about 7 minutes, stirring them every so often and skimming off the scum.  
4. Remove pot from heat and with a slotted spoon remove wings (flats and drumettes) unto a plate... leaving behind the stock and small wing tips.
5. Arrange wings on plate in a single layer and allow to cool. You can blot them from excess water and bake right away... or you can place them in the fridge uncovered for several hours(which is what I did).  
Make Bonus Chicken Stock:
1. To the pot with the chicken liquid and wing tips, add the cut up vegetables, 1 cup water and heat to a boil. 2. Lower heat to a simmer and cover pot. 
3. Simmer for 30 minutes. Remove from heat and strain vegetables. 
4. Place stock in small containers and freeze for later use... or use in recipe of choice.  
Make Korean Sauce:
1. To make sauce, add oil and garlic to a medium skillet and cook till garlic is lightly golden.
2. Add the rest of the ingredients, mix to combine  and continue to cook on low until sauce is thickened....3-5 minutes. Remove from heat and set aside to use for glazing wings. You can do this while the chicken wings bake.  
Bake Chicken Wings and Glaze:
  • Preheat oven to 425 Deg F
1. While oven is preheating take wings out from fridge.
2. Line a baking sheet with parchment and lightly oil parchment paper.
3. Place wings in a single layer, skin side up unto parchment paper lined baking sheet.
4. Place baking sheet on top 1/3 rack and bake for 20-25 minutes.
5. Turn wings over and bake for an additional 10-15 minutes or until nicely golden and crispy. 
NOTE: Baking time varies depending on size of wings, so adjust accordingly. 
6. Remove from oven and glaze with sauce of choice. Sprinkle with toasted sesame seeds, if using the Korean sauce. 
Tip: If you have any leftover sauce, you can easily stir-fry a few veggies with a TBS of oil for a couple of minutes and add in a heaping TBS of the Korean red pepper sauce to coat. For the veggies I used 1/4 of an onion, a couple handfuls of  flat snap peas and 1 medium zucchini.


Thứ Tư, 21 tháng 5, 2014

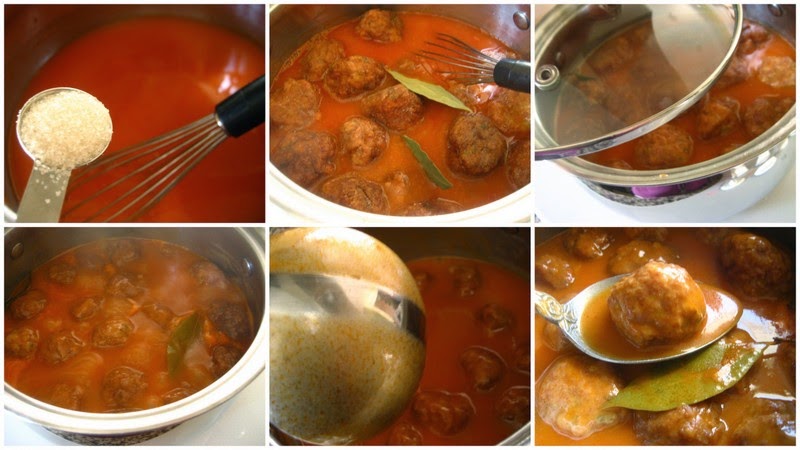
Romanian Chiftelute Marinate... Chicken Meatballs in a light tomato gravy. I realize I haven't posted in a great while. Probably the longest break I've taken since the first day of blogging. Many of you may have wondered why the absence. 

I can't explain how it all happened. It didn't happen all of a sudden. But I've come to a point where I've lost the passion I once had, that kept me blogging because I LOVED it. I still love to cook and am in the kitchen cooking or baking most days.    

While this blog will always have a special place in my heart (I still use it for my personal reference), I've slowly decided to back off a bit. I'm sure I'll still be around... especially to answer questions... and post a new recipe every once in a while. And I ALWAYS love to hear your feedback. 

But for the past several years, I've struggled to write about what matters most to me... here on a food blog. My relationship with the Lord Jesus Christ has hardly been mentioned... aside from the verses posted on the side and banner above.... and in a few comments.  I didn't know how to combine the two without feeling like I'm "shoving Christianity" your way.  So I've kept this site mostly free from what matters most to me in my life... and that is my Saviour, My King, the Lord Jesus Christ.   

So during my absence, I've been trying to strengthen my spiritual walk in written form. As a little girl I used to write in a journal of sorts. It wasn't daily, but it was a special place where I could talk with my Lord about what mattered most to me. I kept the journaling for a few years... then college years arrived, then marriage and slowly my journaling dissipated from my life.  

This past February I decided to blog about my walk with God... in another place. Separate from food. Separate from other activities. I didn't want to share my spiritual blog with anyone....  Didn't see the need to. Actually, my writing started well before February, in a small notebook...  and later on it moved to a blog. Since writing on the blog, the Lord kept nudging at me... share it... because someone may be encouraged. 

My desire is for all my readers to know the true Savior... the one who died for our sins, that we might have eternal life. I realize that God has to do the work of salvation in each of our hearts... He ultimately  does the saving. Not me, not you. But He does use us to further His kingdom. And so I'll share my other blog... for spiritual food... for those of you who care to drop by and be encouraged to walk daily with the King. Here is the link: God's Grace In Montana. I'll also place a link on the side bar for quick reference.

~~~~~~~~~~~*******~~~~~~~~~~

I couldn't drop by without sharing a recipe... a recipe I LOVED as a child. I made it recently and thought to add it to my Romanian section and hope you enjoy it as well. The recipe, in order to work, requires made-from-scratch meatballs... you could probably get away with using a good quality chicken stock, but I highly recommend a homemade version as well. And while you can serve the meatballs and sauce with rice or pasta, I wouldn't recommend it... just because good mashed potatoes and this dish work incredibly well. 

The sauce is a light tomato gravy that has a slight tanginess from the vinegar...but is balanced by a touch of sweetness.  Yes, it's simple, but it's delicious with the flavorful meatballs. There is no garlic or onion in the sauce.... and I wouldn't add it either, just because in order for this dish to be different from other sauce recipes, the sauce has to let the meatballs shine. There's nothing overpowering. 

I'm sure there are a ton of variations to this dish... but this is the way my mom made it and I wouldn't have it any other way. I know I usually say you can change the recipe to fit your tastes... and you definitely can:)... but somehow this recipe is good as is. You can decrease the vinegar a bit if you like, and if you like your sauce a bit more tomato-y, feel free to use rounded tablespoons.  Also, if you like a thicker gravy add slightly rounded tablespoons of flour as well. 

Thank you for being faithful readers and for being with me all these years. I'll do my best to post a recipe every so often.... but my priority is growing in the knowledge of the LORD. Hope you enjoy...
       
You will need:

Note: I've included the links below to the meatballs, stock and mashed potatoes.


Sauce:
2 TBS oil
2 TBS flour
2 TBS tomato paste
1-2 TBS apple cider vinegar, depending on tanginess desired
1/2 tsp sugar
few whole peppercorns
2 bay leaves
salt and freshly ground pepper as needed
chopped parsley

Side:

Directions:
1. Add oil in a medium soup pot  and heat on medium/low till oil gets somewhat hot. 
2. Whisk in the flour and cook for a minute or so... until flour is thoroughly mixed in with the oil and turns a pale color. 
3. Remove pot from heat and add vinegar... it will sizzle and clump up somewhat. 
4. Off heat, add the tomato paste and whisk until fully combined with the flour mixture.
5. Slowly add the chicken stock while whisking continuously to remove all lumps. 

6. Place pot back on heat and add sugar, bay leaves and a few whole peppercorns. You may choose to season with salt if needed... depending on how salty the chicken stock is. 
7. Add cooked meatballs to sauce and increase heat to bring the sauce up to a boil. Cover pot and lower heat to maintain a simmer.
8. Cook sauce for 10 minutes covered. 
9. Remove lid and cook an additional 20 minutes ... adjusting heat to maintain a soft boil. I left my heat on a medium/low. Stir sauce every so often to ensure nothing is sticking. 
10. Cook until sauce coats the back of the spoon and thickens slightly... similar to a gravy. Sauce will thicken a bit more as it sits and cools down.  
11. Season with salt if needed and ladle unto a mound of creamy mashed potatoes. Sprinkle with parsley and freshly cracked pepper. Serve with a salad... or pickled vegetables/sauerkraut/pickles.

Thứ Ba, 1 tháng 4, 2014

Cornflake-Crusted Baked Chicken. Sometimes I crave a good fried chicken. You know, the kind with the crunchy battered crust. I'll be honest, I don't remember the last time I had a good 'ol fashioned fried chicken. Not the healthiest of things... but tasty-good nonetheless:). 

So I set out to mimic the fried chicken somewhat... I say somewhat, because I ended baking my chicken. I decided to use a cornflake-panko crust rather than a flour based, just so the crust would have that extra crunch. 

And even though I ended up using boneless chicken (it's what I had in the house at the moment), I much prefer the bone-in chicken as it keeps the meat juicier and doesn't dry out as fast. The boneless works too, though you'll need to watch the baking time, so as not to over bake the chicken.

The spices were something I sort of grabbed from my pantry, but I loved the flavors. You can easily adjust the salt to  taste. I found the salt I used was minimal, but maybe it was better that way:).

While the fried chicken has a crispier topping, the baked version manages to get some crunch (from the cornflakes) without the need to fry. I ended up processing my cornflakes in the food processor... making the crumbs quite small.... letting the processor go too long(!). But if you just crush the cornflakes with a mallet, you'll get a a more scraggly sort of crust with a bit more texture.... reminiscent of the fried version. It's probably a better way to go about it:). 

Oh, and if you have a baking rack with large open grid space, use that instead...there will be more airflow around the chicken= crispier crust. It would be better than what I used:).  In any case, we enjoyed this somewhat healthier version... great with any sauce you like. Hope you enjoy...

Note: While this chicken is not gluten-free, you can opt to substitute the panko for extra cornflakes, or use a GF panko to make it  totally GF. 

Tip: You can make this ahead by marinating  the chicken in the buttermilk mixture... and combining the dry ingredients in a zipper-lock bag (all but the oil) the night before. When  ready to bake,  heat the oven, toss the crumb mixture with oil, coat the chicken, and bake.

You will need: 

6 chicken breasts (you can use bone-in, or even dark meat)
1 1/2 cup buttermilk (or milk and some plain yoghurt mixed)
2 1/2 tsp salt, or to taste
1/2 tsp pepper, or to taste
1/2 tsp hot smoked paprika, or to taste
2 tsps onion powder

Crumbs:
2 1/2 cup corn flakes (I used unsweetened)
3/4 cup plain panko bread crumbs
1 tsp celery salt
1/2 tsp sweet paprika
1 tsp dried oregano
salt/pepper to taste

Moisten Crumbs with:
2 TBS oil

extra oil as needed to brush wire rack

Directions:

1. Whisk buttermilk(or milk with yoghurt), salt, pepper,  paprika and onion powder  together in large bowl. Add chicken, turn to coat well, cover, and refrigerate at least  a few hours... preferably overnight. 
  • Adjust oven rack to upper-middle position
  •  Heat oven to 400 degrees F. 
  • Set wire rack on rimmed baking sheet and coat rack with oil.  (I used a broiler rack with minimal airflow, but if you have a traditional cooling type of rack with wide open grids, use that instead...  as you want to have enough airflow go around the chicken for maximum crispness)
1 Process  crumb mixture in a food processor for  just a few seconds...  until crumbs are  medium sized.

Note: I processed mine a bit much, made finer crumbs, but I think it would be better if cornflakes are crushed by hand and mixed with the rest of the ingredients to get a coarser crust. Though if you like a finer crumb, you may do as I did:)

If crushing corn flakes by hand,  place cornflakes in a ziploc bag and run a rolling pin gently over them, then mix the corn flakes, bread crumbs, and spices in a shallow dish until combined. 

2. Drizzle  2 TBS oil over crumbs and toss until well coated. 

3. Remove one piece of chicken at a time from marinade and dredge in crumb mixture, firmly pressing  the crumbs  to adhere on all sides of chicken. 

4. Place chicken on prepared  oiled rack... hopefully you have a better rack than I do:).  

5. Bake until chicken is deep golden brown, juices run clear 20-45 minutes or so.... just check because boneless chicken breast bakes quicker than bone-in or dark meat. Just try not to over bake and dry out the chicken.

Thứ Năm, 20 tháng 2, 2014

Japanese Tsukune... Glazed Chicken Meatballs. I've been stuck on Japanese food for sometime now, as you can tell from my previous posts. But I didn't want to skip this recipe... a recipe for making some real flavorful Japanese chicken meatballs. Meatballs always seem to be a favorite, with kids and adults alike. They're just good... however you make them.

So one day, as I was looking through some archives on a favorite blog, the GingerCookies, I came across a Japanese meatball recipe... the Tsukune. Immediately I loved the recipe, and I had most of the ingredients in the house... which always, always makes it much easier to execute a recipe on the spur of the moment:). 

But I especially liked the recipe because the meatballs were made with chicken meat. I use chicken in quite a bit of my cooking, so I tend to have some in the freezer most days.  Usually I have a variety of cuts, either individually wrapped or in small batches. Ground chicken is a favorite to freeze, because it comes in real handy when making quick dishes. 

So that particular day, on the spur of the moment, I took out my 1 pound bag of ground chicken from the freezer and defrosted it to make these Japanese meatballs. I ended up cooking the meatballs 2 ways... half the batch was cooked in a skillet in a bit of oil, while the second batch was baked in my toaster oven, using the broiler. Both ways worked well, though the skillet method brought in more flavor from the browning(of course:))... but they were also a bit flatter, probably due to my meat mixture being a bit soft. However, the toaster oven method resulted in rounder meatballs, though lighter in color. In the end they were both good:). 

I combined both sets of cooked meatballs in a skillet and then added the sauce I had cooked in a pan earlier. In order for the sauce to coat the meatballs and not be runny, I cooked the meatballs and sauce together in the skillet for couple of minutes or so... just enough for the sauce to thicken and glaze the meatballs nicely. The glaze is minimal on the meatballs... so if you like more sauce, you might want to double the sauce recipe.

The meatballs are great served as an appetizer, with a favorite dipping sauce. Or  they can be served on top of a bowl of rice.... maybe with a side of vegetables. Here is yet another way to make meatballs, a bit different than the norm, but flavorful and quite delicious. Hope you enjoy...     
    
Note: I wanted to make this dish gluten-free, so I omitted any form of breadcrumbs as per Veronika's recipe on Ginger Cookies... but if you feel your meat is a bit  too loose, you can add some breadcrumbs, or increase the cornstarch amount by a couple of tablespoons. 

You will need: inspired by GingerCookies

Meatballs:
1 lb ground chicken
1 tsp grated ginger
1/2 tsp dry garlic flakes (or 1 crushed garlic clove)
4-6 TBS cornstarch 
2-3 green onions, chopped finely
1 egg
1/2 tsp kosher salt
1/4 tsp sugar
2 tsps coconut aminos (or soy sauce)
8 slices dried shitake mushrooms, soaked, stems removed and squeezed dry (or 2 whole fresh)

Sauce: if you like, you can use a sweet and sour sauce here... to make it easier on a weeknight:)  
1/4 cup mirin (I used white wine)
1/4 cup coconut aminos (or soy sauce)
2 tsps ginger juice
2 TBS rice vinegar
2 TBS honey (can use sugar)
chile flakes, optional
salt and pepper, if needed

Slurry:
1-1/2 tsp cornstarch+ 1-1/2 TBS water, mixed 

Directions:
1. Soak dried shitake in hot water until soft. 
2. In the meantime, place rest of the meat ingredients in a bowl.
3. When mushrooms are soft and fully hydrated, drain, squeeze dry and remove stem... then chop finely.
4. Place mushrooms in bowl with meat mixture. 
5. Combine all meat ingredients and cover. If you feel the meat mixture is too loose, you can add some breadcrumbs, or a couple more tablespoons of cornstarch. Place in fridge for a couple of hours or overnight. 
  
6. Form walnut size meatballs... you may need to wet hands to prevent the meat from sticking to hands.  
7. If baking meatballs in oven: Place meatballs on parchment paper lined sheet pan. Bake in toaster oven using broiler heat... for 10-15 minutes, or until cooked. 
If frying meatballs: Heat a large skillet on medium heat, add about 1/4 cup oil... when oil is hot, add meatballs. Cook on one side till golden, flip and cook second side till meatballs are cooked through. Remove meatballs and set aside. 
Note: Frying gives the meat extra color, but  the meatballs sort of loose their round shape(my meat mixture was a bit loose). Baking them kept a more round shape, but weren't as deep colored. You can opt to add a bit more cornstarch(or breadcrumbs), if you find your meat mixture is too loose. 
8. Make sauce:
In a saucepan, add sauce ingredients, bring to a boil, then add cornstarch slurry, whisk to combine and heat till thickened. remove from heat.
9. In a  skillet  on low heat, combine sauce and meatballs... cook stirring until sauce adheres to meatballs and glazes them nicely.  
10. Place meatballs on wooden skewers. Serve with sushi rice and a sprinkle of chopped green onions.

Thứ Hai, 30 tháng 12, 2013


Korean Style Beef Chicken Rice Bowl... super quick and versatile. 

~Happy New Year~ 
~Wishing each of you a blessed 2014
And
God's Grace and Mercy~

Thank you for stopping by in 2013... appreciate each of you!

It's been a very long time since I've bought ground meat. A VERY long time. Ever since I acquired my meat grinder, years ago, I have been grinding my own meat. For some reason, I find home ground meat superior to the store-bought... it's nice because I can choose the type of meat I grind and don't have to worry about additives and other things related to the store-bought version. 

As a child I remember my mom using the hand cranked grinder to do most of her grinding. Sometimes she bought quite a  bit of meat to grind... and that always required a bit of muscle strength. My mom would end up doing most of the grinding, but sometimes she'd have us kids do the job. While it was fun grinding,  we'd most definitely feel the sore muscles the following day:).  

When I first bought my Kitchen-Aid mixer, I knew I wanted to buy the grinder attachment as well. It would make it super simple for me to grind all sorts of meats. And no hand cranking involved:). In any case, grinding my own meat has been something I do... without really thinking about it as being a  chore. I love to portion out the ground meat and label it... and freeze. It becomes really easy then to defrost whatever amount I need... and use it in a quick meal.  

So the other day, I had defrosted some ground chicken and was scrambling about to fix dinner. I needed something that would come together quickly... plus I had these butter lettuce leaves from a previous dinner in my fridge that I wanted to use up. I instantly thought of making lettuce wraps. But I also knew the lettuce wraps weren't going to suffice as a complete meal. That's when I decided to cook some rice and make a Korean-style rice bowl. It would be quick and I would have dinner on the table in a matter of minutes... well, in under half hour.

I had all the ingredients I needed... even went out in my garden to fluff away the snow that had settled on the green onion and chives. They were frozen, but I knew it would work in the recipe:)... no need to go out and buy green onion. And while I made the recipe with ingredients I had in the house, I've added some notes to help with some substitutions that can also work. 

I've slowly started going away from soy products and am LOVING the coconut aminos as an alternative... so, so good... and you'd hardly notice it isn't soy based. And if my husband loved it, it's always a plus:). However, feel free to use what works for you.... I personally notice I do better without the soy. And if using the coconut aminos, the dish becomes gluten-free as well. Hope you enjoy... 

Note: While I used a soy-free version of "soy sauce", you can easily use regular soy sauce, but will need to adjust salt amount. You can totally skip the salt and add extra soy if you like. And if you don't have the Korean chile flakes, you can substitute it with regular chile flakes, although you will need to decrease amount to taste... and you may want to add some paprika to obtain the color of the Korean chile flakes. 

If you have gochuchang on hand, the sweetened fermented Korean chile paste, you can use a tablespoon or so and skip the honey and/or gochugaru flakes. While I ended up using only 1 TBS of honey, the dish can easily take  more, especially if you like the dish to take on a sweeter flavor.  

Tip: The dish can be on the "dry" side , so feel free to top with extra sauce of choice and mix it in... even a fried egg on top would work rather well, leaving the yolk runny.

You will need:

1.5 lb ground chicken (can use beef, or turkey)
1/3 cup small diced onion (can use a large shallot)
2 TBS olive oil

Sauce:
4 1/2 TBS coconut aminos (soy-free alternative sauce) 
1 TBS rice vinegar
1 1/2 TBS toasted sesame oil
1 TBS ginger juice(can use freshly grated)
2 garlic cloves, grated
1 TBS  Korean gochugaru chile flakes
1 TBS honey, or to taste
3/4- 1 tsp kosher salt, or to taste

Additional:
1/4-1/3 cup chopped green onion(chives work), reserve some for topping
toasted sesame seeds, to taste
lime juice, or rice vinegar, as needed to balance out the dish
extra coconut aminos, as needed (or sauce of choice... soy, hoisin, plum, sweet sour, etc.)

Serve with:
cooked short grain rice (I like to use sushi rice)
cooked fried egg, to top rice bowl, optional

Directions:
1. Mix sauce ingredients together and set aside... adjust salt to taste, use a bit less in the sauce, as you can always add more at the end of the dish. I found 1 tsp to be about right, when final dish is adjusted with a bit of acidity. 
Note: If using soy sauce the salt amount will differ.... you can skip salt and add a bit more soy sauce to taste. 
2. Dice onion (or large shallot, if using). Heat 2 TBS oil in a large skillet on med heat. Add diced onion and cook until slightly golden, stirring every so often... about 2-3 minutes. 
3. Add ground chicken (or meat of choice), and cook until nicely caramelized, stirring and scrapping brown bits that may form on the bottom of the skillet. This should take about 5-8 minutes... the meat may release a bit of liquid, but I like to cook it down so that the meat browns bit. If you like your meat to have some extra liquid, you can cook the meat until no longer pink.
4. Add reserved sauce and cook until meat is thoroughly combined with the sauce and meat is flavored well. 
5. Adjust seasoning, by adding extra salt, or coconut aminos(or soy sauce if using) and adjust the overall flavor with a bit of rice vinegar or even a squeeze of lime juice.The acidity balances out the flavor of the dish. 
6. Stir in most of the chopped  green onion (or chives). 
7. Serve with hot steamed rice... and sprinkle with toasted sesame seeds. Top with extra chopped green onion. 
Note: I like to serve the dish with some sort of vegetables be it raw, lightly steamed or pickled. Kimchi would work really well, as would marinated cucumber salad or even raw grated carrots, lightly seasoned with sesame oil and vinegar.  

If you would like to make lettuce wraps:

Spoon some meat filling in a butter lettuce leaf cup, add some chopped peanuts, or sesame seeds, chopped green onion, and a drizzle of sauce... be it coconut aminos, soy sauce, plum, hoisin, sweet and sour, etc. Sprinkle some grated carrots for extra color and crunch. You could even add a spoonful of rice on the bottom of the lettuce cup, if desired.  Be creative with the additions, as you can add all sorts of other veggies... bean sprouts, shredded seasoned cabbage, water chestnuts, etc.       
Note: If you have any leftover rice and seasoned meat (you'll have leftovers only if you are making this for a single/double serving) ... you can always turn the leftovers into fried rice and stretch the dish even further.  You can use bits and pieces of vegetables you may have in the fridge by sauteing them quickly and adding the leftover meat and rice. Adjust seasoning with a bit of extra sesame oil, vinegar, coconut aminos (or soy sauce)... or sauce of choice. I just used some roasted vegetables(chopped fine), a carrot, half an onion, a handful of peas along with a chopped red chile.  

nghe nhạc trực tuyếnNấu món chay | học nấu ăn DJ - Ảnh đẹp | xalotinnhanh