Heya! Lately I've been spoiled badly with all the plates that I received, but doing those reviews also ment that I didn't get to play as much with each plate as I'd like (not complaining here, don't get me wrong, it's awesome and I feel SO honored that I got those opportunities! :)). Having foster kittens doesn't help either, but my current sweeties are doing great, and stamping decals combine nicely with kittens: I can make them in between and won't have to walk around with wet nails as much! So that's exactly what I did here, I took a plate from a set that I wanted to play more with, Bundle Monster's Shangri-La set, and made decals on my Uber Mat last night while they were sleeping. And today, during another nap, I finished the mani :)
I made decals with a white stamped design and colored them in with a bunch of colors and the dual sides tools I showed recently, but the downside of so much colors is that you can end up with thicker, uneven decals. Then I thought of ridge filler, and that worked great! So instead of using a lot of top coat to even it all out, I glued the decals onto my nails with basecoat, then used just a thin layer of top coat (since I wasn't sure how ridge filler would work directly on the decals, I'll try that out some other time), then ridgefiller, then another thin layer of top coat. Because the decals were already dry, and I used a fast drying top coat, it didn't take much time at all, and the result was a lot smoother and thinner than with a couple coats of top coat!
China Glaze Aquadelic with accentnails of Konad White with Bundle Monster BM-S107 and China Glaze Aquadelic, China Glaze Fuchsia Fanatic, HEMA #840, W.I.C. by Herôme Aarhus & Yokohama.
... in a land far, far away, there was a young woman named Brittany. And she brought us lots of awesome plates! Yeah, I can't say I'm feeling inspired to write a fairytale right now :P But one of UberChic Beauty's latest plates, the Fairytale plate, did inspire me! The plate is packed with fairytale related images, so let's have a look at it, see if you're getting inspired too :)
clickable for an enlargement
This plate seems to be especially perfect for people that enjoy creating little stories on their nails, or that like skittlette manis, because you really can go nuts with all these images! Although I can appreciate a story or skittlette on someone else's nails, I usually prefer all my nails to be the same, or maybe just an accentnail here and there. (I can get a bit restless and it can feel unnatural if they ain't the same/similar and then I just want to take it all off, I suspect it's my autism that's involved there as well, but I'm slowly getting into more variation :)) Having said that, I can totally see what you could do with this plate! You could obviously start your story with the text on the top left, and use that image next to it with a path leading to a castle, and then fill the rest of your story with dragons and knights, or go for the princess route, with the top right swirly image? And I see plenty images to create a Cinderella story! You could also make a knight's armor look with the full nail image on the right, or go for a royal look with crowns, maybe in deep, matte red with shiny gold. The full nail wings on the bottom left can also be used as fire, or just as a random stripey design.
For this mani I stamped the leaves design in green on my Uber Mat, and colored them in with 4 different greens. I then applied a thin coat of the basecolor over the decals, let them dry, and applied a coat of basecolor to my nails to which I applied the decals. If you apply a decal, there's a chance that you get airbubbles underneath, and if you stick with just the clear top coat on the decal, they'll be visible through that top coat. I might have airbubbles under this mani, but because of that layer of color, they ain't visible. I think it's much more relaxed to apply the decals like that! I do notice that these decals can get a bit wobbly from all the polish, and need a few layers of top coat to give a smooth result - or just a layer of matte top coat. That way it'll look smooth without much coats ánd the design will often stand out more as well!
Essence Exits On Your Right with Konad Green, Essence Brazil Jungle, Catrice Run Forest Run!, China Glaze Gaga For Green and W.I.C. By Herôme Malmö, UberChic Beauty plate UC Fairytale-01 and Dance Legend Top Satin.
Do you like stories on your nails? And what do you think of this plate? Let me know what you think, and do feel free to share your manis in the comments (links are automatically marked as spam, but you can upload an image there)! :) Thanks for looking and have a wonderful weekend!
The product(s) in this post was/were send to me for review. For more information, please have a look at my Disclosure Policy.
Besides the Uber Mat, which I blogged about in my previous post, UberChic Beauty also released a bunch of new plates! A new collection and 2 loose plates, and today I have my review of the collection for you :)
The plates have the usual UberChic Beauty size, and so do the images. And yes, they have the protective back and blue foil too, I'm sure that didn't come as a surprise! I like the size of the UCB images, when my nails are a bit shorter I can even stamp them sideways as well, offering even more options. I recently updated my stamping plate size comparison, you can see how big these images are on this blogpage. Here are the plates in the 4th collection, all plates are clickable for an enlargement!
These plates really have that UberChic feel to them, don't you agree? I'll tell you straight away, it's yet another lovely set by UCB if you ask me! What I like a lot is that several images can be combined beautifully, because they're based on the same design, as the bottom right images show well. Or the loose flowers in the middle, that match the full nail image in the middle right. And that full nail image left of 'Indie ♥' reminds me a lot of an image of UCB plate UC 1-03 (the image on the middle of the right row), I think they'll match well to get a design stamped on normal and in the opposite way!
The 2nd plate offers more of that typical UCB mix, floral, swirly, some really fine lined flowers, some geometric designs... That rose near the middle almost looks fiery! The image above that is the one that I used for today's nails, love it! If you looked closely and are wondering, the bottom left image in the corner has a little bit blue foil residue on it, nothing a little remover won't fix! I just noticed it later on :) And speaking of that image, I think those thick lines can create a nice balance between the stamping and a 'heavier' base, like a glitter or holo (instead of a more neutral, calm creme). With such thicker images it's easier to not have the base overpower the stamping.
The last plate of this collection has a lot of designs that straight away jumped out to me, from the fine lines and the wider, more swirly lines (both around the middle), to the flowers with matching small flowers, and of course the wobbly net design and the one below those thicker lines (2nd row from the left, 2nd from the bottom). Such images like the last one can be tricky to get even on all nails, and I can be way too much of a perfectionist for such things. But with the reversed stamping, it's so much easier!
These nails were done with that same technique, I applied a thin layer of top coat to the Uber Mat, stamped the design in black and took a bunch of holos from the good old OMG collection, and colored the design with a pointy dotting tool. So easy, yet with a lot of effect! The grey nails were done with a matte polish, but it didn't dry as matte as I'd like, so I added some extra matte top coat.
Catrice Pebble Beach with Dance Legend Top Satin, accentnails of A England Camelot with Konad Black and UberChic Beauty plate UC4-02, with China Glaze LOL, DV8, BFF, QT, IDK and TTYL.
And here's how that looks in the sun :)
I guess it's clear that I'm getting the hang of the reversed stamping, I'm starting to enjoy it more and more! ^^ What are your thoughts on this mani, and UberChic Beauty's Collection 4? I'll show the 2 new loose plates soon too if you're interested in seeing those. You can find all the UCB products on their website, but you can also find them on Facebook and Instagram. Thanks for stopping by and take care ♥
The product(s) in this post was/were send to me for review. For more information, please have a look at my Disclosure Policy.
UberChic Beauty just released something new, something that we haven't seen before, and something that's called uber. But is it? Time to find out, here's my review of the Uber Mat!
My usual items:
As you might know, I use a placemat to polish on and to protect my desk. It's a sturdy plastic thing, and I have it on my desk most of the time. It protects my desk, I can check out how a design would look by simply polishing/stamping it onto the placemat, and I can use it for things like gradients. I can also clean it along when I clean my desk, and place (hot) food and drinks on it. The downsides?
• It isn't acetone-proof, the aceton dries out the plastic, which makes it curl up, hard and wonky. • It can get stained easily (probably thanks to the acetone as well), and it's nearly impossible to get it fully clean after a while. It still does the trick, but a smudged placemat just doesn't look so nice on my desk! • The placemat is so smooth, I use my keyboard to keep it in place on my desk (yes, my keyboard also gets some polish and acetone on it at times, my previous one looked like a mess eventually >.<). But sometimes it still moves, and my desk does get at risk for polish at times. • I can't make decals on it. • I don't think every plastic placemat will be suited for this, not all plastic reacts equally well to acetone.
When it gets all curled up and smudged, I usually replace it. It takes some time though, so all in all it's a cheap option that worked for a long time for me!
Then about the decals and reversed stamping. I recently started with making stamping decals and reversed stamping designs (simply put, you get a design on your stamper, color it in, and seal it with top coat to create a 'sticker' that you can glue onto the nail with a little top coat), and I quickly found out that it takes a LOT of time to create a full mani when you only have 1 stamper! So I ended up buying a few more, but there's another downside about the stamperhead decals for me. The stamperheads are usually a bit rounded, and the finished decal will be a bit curvy too - in a different way than my nails are! You can also use things like a ziplock bag, ovenpaper or a silicone baking tray, but the first 2 options are a little messy in my opinion, the silicone baking tray is something I've never tried. It's a technique that's been around for quite some time, but only recently really started to get used a lot with the use of stampers, so I guess I'm not alone on considering the other options messy!
~~~~~~~~~~~
The Uber Mat:
Here's what UberChic Beauty has to say about it:
1. Easily test out color combos on your mat 2. Protect your table from stains and spills 3. Simple Cleanup: Acetone and Nail Polish Remover proof 4. Create easy peasy stamping decals 5. Reverse stamp like a boss 6. Super flexible for easy cleanup and storage 7. Makes you feel 20% more chic 8. We just put this in here because we know we haven't covered everything you can do with this...
And here's their video to go with that desciption:
~~~~~~~~~~~
Now, let's have a look at the mat!
It's a nice size mat, a bit smaller and a bit higher than my placemat. It's 40.5 x 30.5 cm (16 x 12 inch). And it sure looks a lot better! :D It feels nice, like very soft rubber, but it isn't sticky (like some stampers are). The bottom is just a little bit coarser, and even though you can fold it and roll it up, when you put it down it stays in place! The nails on the mat are squoval and rounded, and their size is around 2 x 1.1 cm, which is pretty much the length of my thumbnail. You can of course also create decals on other parts of the mat, or just polish outside the nail outline to make it bigger, but for me it's a perfect size to get an idea of how something would look on my nails!
To give you an idea of the size, here it is with a standard business card style scraper, a bottle of Seche Vite and a Dance Legend bottle, and an UCB plate. And bonus kittens! Nala and Munchy joined when I was taking photos, and I figured you wouldn't mind seeing them :)
Fold, roll, crumple, the Uber Mat has no problems with it!
Here's how my current placemat now looks, and yes, it's thát curled up from the acetone. I'm sure it's clear which one I prefer to work with and look at!
~~~~~~~~~~~
Here are a few things I wanted to try out with the Uber Mat:
• Decals/reversed stamping of course! The Uber Mat will ever so slightly curve upwards where you apply your polish, so your decals aren't 100% flat, which I think is a nice extra touch. Not as curvy as the stamperheads, just a hint of curve to match easier with the curve of your nails, and it's not rounded like the stamperheads. It's subtle enough that I couldn't capture it well (sorry about that!). Another thing, on my stamper I always start with the stamped design (I'm not even sure if it works starting with top coat on a stamper, I'd guess not?), then the coloring, then the top coat to make it into a decal. But applying the top coat has a risk of smudging the design. Both on the stamper, ánd on the nail when you seal in the finished look with top coat! Because you can easily start with top coat on the mat, then stamp on top of that and color the design, you don't have that issue at all. When you apply it to your nail, the top coat side will be up, so sealing it in doesn't smudge it as easily either! And another handy thing of using top coat first, the design will look a bit matte on the nail before you apply the final top coat. So you can straight away get an idea of how the mani would look when mattified :) And it's SO easy to create a whole bunch of decals at once, if one fails then you won't have to start all over again on your stamperhead(s), you just pick the next one of the mat! The whole thing just works very nice, not having to hold the stamper, but just coloring the design like you're drawing on a piece of paper on your desk. This mat really made the whole decal/reversed stamping a lot more fun for me :D
For today's mani I started with 2 decals and planned to use them as accentnails. I maybe should've left it at that, but I really enjoyed working with decals on the mat, and went for more of them :) Here's how it looked after coloring the first 2, what a mess! ^^ This was top coat, a very fine-lined image stamped in black, and colored in with a dotting tool. As you can see, I use plenty of polish when coloring, to make sure I don't smudge or pick up the stamped design while coloring. You can see further down how it looks on the other side, on my nails.
• Glitter polish. Sometimes you have a beautiful, sparkly polish and it just won't stop devouring your top coat, ugh! What happens if you apply it to the mat, let it dry and then turn it around, will that side be smooth and not eat top coat? It would be somewhat of a mess to get 10 glittery nails like that, and will take you some time, but is it an option? The answer is... nope! Aww. Shown here is one of the biggest top coat eaters that I could think of right now, Nubar Violet Sparkle. So pretty, but such a hassle to get smooth! I applied 2 coats to the Uber Mat and let it dry, then I peeled it off and turned it around, and yes, the bottom was very smooth. It looked like mattified glitters. So far so good! Then I top-coat-glued it onto my nail with the coarse side down and applied top coat on top, but that quickly sank in, bringing out the coarse glittery look and the result was that I still needed more top coat. Having said that, you can still use sparkly decals like this to create an easy accent or bigger part of your mani, like a stripe of glitter (just cut the decal into strips) or a diagonal half glittery nail! Or maybe glitter splatter decals?
This photo might look a bit strange, but what you're looking at is my hand under the mat. Just a slight movement of the mat and the whole thing comes off so easily! However, I'd advise you to use a tool to pick the decal from the mat, because if you have more decals on your mat, those will come loose as well if you move the mat.
• Lint roller cleanup. You can easily clean your stamper with a lint roller or simply a piece of tape, which doesn't work with my placemat, but it does work on the Uber Mat! This was something I was curious about and I'm glad to see it works, no need to make a mess of those oh-so-pigmented stamping polish remains, just let them dry and pick them up with some tape or a lint roller. It also works with blobs of polish (remains from coloring decals), again, just let them dry and roll them off your mat!
• Clean it. Since my mat is almost always on my desk, I prefer to clean as well when I'm cleaning my house. The mat seems to have no issues with this, so that's an added bonus. Please note though, I'm not sure how the mat will react (in the long run) to those chemicals that aren't polish or acetone, this is just me testing out something that I used to do with my placemat!
• Be able to put hot items on it, like a cup of tea. Yeah, this and the cleaning test were a bit scary, haha! How will this new, fancy mat react to such things? Well, this too seems to be no problem, but again, this is me testing, not something the mat was made for. if you don't want to take any risks with it, simply put it aside when cleaning or when you have something hot nearby :)
~~~~~~~~~~~
Tips:
• Use a tool to pick up your design. You can also get it off the Uber Mat by simply picking up the mat and moving that (see the photo further up), but that will also cause other decals to come loose. If you weren't done yet with those, and want to stamp on them, your stamper will pick up the unfinished decal instead of transferring the design. I use the flat end of an orangewood stick (lots for little on eBay!).
• You can remove the slight curve in the Uber Mat that appeared after using polish on it, simply by rubbing it a little. I found that wiping the remains off with a cottonpad with remover, in a circular motion, was enough already to make it straight again. On a side note, it seems that the more polish you apply at once (thick layers), the bigger the curve.
• If you have a polish that stains your stamperhead, it might do the same with the Uber Mat. It of course won't affect how the mat works, but if you want to prevent that, test it out on a less obvious spot first.
• Stamp fairly slow, so you give the design time to transfer to the top coat on the mat. If you just press down quickly and ligt up the stamper straight away, you might pick up the decal.
• Decal application tip: lick your finger! Yes, you read that correct, haha. You see, if you smudge your polish before it's fully dry, licking your finger and gently rubbing over the smudge with that finger, can fix that for you (don't make the mistake of directly licking the smudged polish on your nail, heh). So I started licking my finger for the application of decals as well. You easier slide over your nail, so there's less chance of rubbing a little too hard and damaging the decal, and if you hit a bit of the top coat that's on the remaining part of the nail (where you don't have a piece of the decal), it won't matter either. This helps me a lot to give those pesky airbubbles (that can appear underneath the decal) no chance!
• Another thing you can do to prevent airbubbles, is apply a thin coat of your basecolor over the finished decal while it's still on the mat. Then apply some basecolor to your nails and stick them on. If there's any airbubbles, they won't be visible through the colored background of the decal.
• If you want to make a bunch of decals and use them a bit later, put the mat on something hard (like a cutting board perhaps). After creating the decals, you can just put the whole thing aside until you're ready to use the decals. I have tried using decals that I created the day before, which worked fine with the Uber Mat (this didn't work as well when I tried it with oven paper quite some time ago, they got too fragile), although they do get a bit harder, which can make the application a bit more tricky.
• To get a smooth finish on the decal, you can either use a matte top coat (if you have uneven areas thanks to all the coloring, it won't really show when it's mattified) or use a ridge filler on top of the decal. That'll help to create a smooth result, without needing several layers of top coat.
• I wrote a How To: on decals a couple of years ago, have a look here if you're looking for a little more decal inspiration :)
~~~~~~~~~~~
Final verdict:
I'm very happy with the size of the mat (I know this size works well for me) and I like the little extras like the nail outlines and the slight curve effect it has when you polish on it. UberChic Beauty has surprised me with this idea, yet I wonder why we didn't see something like this before, it just makes so much sense to me! I think it's a great idea, and it's clear that it came from someone that loves to polish too :)
If you just want to protect your desk and aren't into nail art, I think there are cheaper options that can work just as well for you. However, if you do like nail art, and especially (stamping) decals and reversed stampings, this really is a great invention for you! If you were put off from trying such things because it's so time consuming with just a stamper, really, give this Uber Mat a go :) It's so much fun, and offers a whole new level to stamping! You can of course go for several loose items, like I had before, but I already have so much nail related items cluttering up my desk area, I much prefer to have this all-in-one option. For me it's byebye to the placemat, and I'll put away all but 1 of my stampers. The ziplock bags and pieces of oven paper can be thrown out now too! Of course I can't say much yet about how long the Uber Mat will last, but I suspect I'll be enjoying this mat for a long time to come. So yes, the Uber Mat definitely gets the my stamp of approval ♥
The UberChic Beauty Uber Mat can be bought at the UCB webshop, however, it's currently out of stock (and no wonder!). If you sign up for their emails, you'll also read when it's back again! The Uber Mat costs $14.99.
Sinful Colors Unicorn with decals made of Konad Black, Orly Spark, China Glaze Peachy Keen, Catrice I Am A Lob-Star and UberChic Beauty plate UC4-01, with Dance Legend Top Satin.
The product(s) in this post was/were send to me for review. For more information, please have a look at my Disclosure Policy.
Hi guys! The last of the 4 UCB single plates that got released recently, is the Love & Marriage plate, and today I have my review of that plate for you. And I used it for a swirly girly mani with pink and glitters!
clickable for an enlargement
This plate truly offers anything Love & Marriage related, from lace and swirly designs to wedding bells and love potion nr. 9. The only thing that I can come up with that's lacking here, is a "will you marry me?" design. Having said that, in most relations it's the guy that proposes, and I have a feeling those guys wouldn't often go for the stamping route to do so =) The plate does offer options to announce your engagement, to have a matching mani for your bachelorette party, and also a bunch of designs that would work beautifully on the big day itself. I think a lot of brides go for a classic French mani? Imagine just a very subtle stamping with a swirly design, or a bit of lace to go with the dress perhaps, or bridesmaids with matching manis? But this plate also offers plenty for wedding guests, or for anyone that simply likes romantic designs of course!
For my mani I started with a matte pink as base, and stamped on the bigger design that matches the weddingdress image, both are near the top left corner of the plate. I then took a silver tip painter and a small dotting tool, and added tiny dots of sparkle to the circle endings of the swirls. No top coat, just a cleanup, I like it just like this :)
Essence Hola, Guapa with Konad White, Essence Silver Sparkle and UberChic Beauty Uc Love & Marriage -01.
I'm continuing my trip around the world with UberChic Beauty's Out Of Africa plate, which is packed with animals, prints and Egyptian designs. Here's a mani I did with it, you can see the plate further down :)
Look at the details in those animal faces! This plate inspired me the most, maybe it's because I was in the mood for some yellow/orange/red and I think those colors match the theme, or maybe it's just because it's yet another plate with wonderful designs. I suspect it's the latter ;) Imagine a sunset gradient and some animals stamped in black, or sand-y colors with one of those Egyptian designs. Now animal prints are nothing new, but with this kinda theme you can't let them out either! And I don't grow tired of a nice leopard print anyway :) I'm especially loving the prints here, and for this mani I went for one of those. I started with a very light grey base (simply because it's a 2-coater, and dries really fast because it's a matte, so it's a lovely polish to start with!) and randomly sponged on some color. I repeated that until the colors really covered, then I added a thin layer of top coat. Stamping in black and a good layer of my beloved Seche Vite and done!
Essence Enter Wonderland with China Glaze Sunshine Pop, Papaya Punch and Ruby Deer, stamped with Konad Black and UberChic Beauty UC Out Of Africa -01.
Now you've seen almost all of the new plates, only the Love & Marriage one to go! I'll post that one soon too :) What do you think of the 3 plates that I showed so far, which one is your favorite? You can find all the UberChic Beauty plates on their website.
The product(s) in this post was/were send to me for review. For more information, please have a look at my Disclosure Policy.
UberChic Beauty recently released 4 new plates (yes, they're on a roll!) and I got the pleasure of reviewing them all :) The first one that I'll be showing is 'The Wild West -01', a plate which is completely filled with -you guessed it- wild west related images. Check out the plate further down!
UberChic Beauty offers collections of 3 plates and loose, themed plates. The 4 new additions to the latter are The Wild West, The Far East, Out Of Africa and Love & Marriage. And I'll tell you straight away, their designs all match beautifully with the theme! Here's the first one:
clickable for an enlargement
From cowboy items to Native American feathers and prints, and of course horses and cactuses aren't forgotten. I'm especially loving the prints, but this plate sure offers plenty for themed nails as well! The images have the usual UCB size (which I think is a nice size, it'll work for most of us), and they transfer perfect! For this mani I went with a reversed stamping with one of the prints. I colored it in completely and turned it into a decal, you don't need to worry about visible airbubbles under the decal when it's fully colored :) Easypeasy! Now I just need to learn to color within the lines :D What do you think of these kinda 2 accentnails looks?
Dance Legend #1031 with Konad Black, Essie Angora Cardi, Catrice New York and UberChic Beauty UC The Wild West -01.
You can find all the UberChic Beauty plates on their website, and if I were you, I'd keep an eye on UCB, because I don't think they're done anytime soon with bringing us fantastic products :) You can find them on social media like Facebook and Instagram or simply sign up for their newsletter on the website. Thanks for looking and keep an eye on my blog for the other 3 plates!
The product(s) in this post was/were send to me for review. For more information, please have a look at my Disclosure Policy.
Hi there! I did a 'reverse stamping' mani the other day with a rose image from BornPrettyStore. When I saw that image, I straight away knew what I wanted to do with it, and I'm glad that it turned out so well! It was quite a bit of work, but I'm really loving the result! :) Here's the finished mani, the plates are further down:
I received 3 plates from BornPrettyStore and all 3 came with a cute cover, blue foil on the front and a rubber back on the large plates, a normal back on the round one. The plates work like a charm, and the size of the full nail images is nice too. The average sizes of the full nail images are 1.5x2.1cm (round plate), 1.45x2.0cm (lace plate) and 1.4x2.5cm (floral plate). I'll of course add them to my comparison later on as well!
I used the bottom image and the matching small one for today's mani. I like the variation that this plate offers, while staying with the rose theme!
If you're looking for a lace image, this plate should do the trick for you, that's a lot of pretty lace designs right there! The 2 at the top left, and the one with the vertical stripes, seem perfect for a little extra on top of it. Maybe a nail sticker or decal, or perhaps one of those smaller roses from the plate above?
If you do like roses but don't want a plate full of it, this one has lots to offer too! I like the top right design, and the bottom left, that'll be perfect for the coming season. And the one in the middle of the bottom row, pretty! Those 2 on the top row (number 5 & 6 from the left) might match well together, if you like some variation on your nails.
As I said above, I used a rose design of the round plate and went for a reverse stamping. I stamped it in black, but kept it on the stamper, then I colored it in with some nail art brushes and 2 more stamping polishes, before turning it into a decal. I think you can stamp it on the nail right after coloring as well, if you press a bit harder on the stamper and hold it in place on your nail for a little bit. But I wanted to see how it looked with the right side up first, so I used some top coat (Dance Legend Go Fast gave a nice, thin layer for this) to turn them into decals. And it was a good thing that I did so, because some didn't turn out as well! I noticed that you can best use quite a bit of polish on your brush to color the design, if you use too little, the brush might end up picking up the stamped image (in my case, the black outlines). And don't spread the color too much, else it might mix with the stamped design, which created dark red roses without black lines, haha. So just appying a decent amount of color worked best for me.
I'm eager to try more of this technique, however, next time I'd try it with normal polish instead of real stamping polishes. The cleanup from the decals with these highly pigmented polishes wasn't the most pleasant! And I want more stampers now, because it just took a lot of time to wait for each design to be fully dry and ready to be placed on the nail. I bet it works nicer if you can make a couple at once! Lastly, after placing them on the nail and sealing them in with a little top coat, I added a matte top coat to really pull it all together. There's some little flaws in the coloring, and also in the decals itself (applying them on my left hand with barely any bubbles is one thing, but on the right... haha!), but thanks to the matte effect it's hardly visible. Gotta love that stuff! ♥
Dance Legend #1031 with Konad Black, Red and Green and BornPrettyStore BP-73 and Dance Legend Top Satin.
What do you think of these plates? And have you done any reverse stamping? If so, I would love to see it! Links in comments are blocked, but you can upload an image with your comment as well, please feel free to do so :D Thanks for looking!
The product(s) in this post was/were send to me for review. For more information, please have a look at my Disclosure Policy.
Hey all, here's a mani that didn't go as planned, but I'm liking the result nevertheless! I wanted to make a blue watercolor base, but that already went wrong on the first nail. Lesson 1, don't apply the drops of polish straight from the bottle, you might end up with a huge blob instead of a small drop, haha! So instead of a real watercolor base (apply basecolor, then top coat to protect the base, add small drops of color, take a brush with remover and 'paint' it on the drops of color to create a watercolor effect), it looks more like saran wrap meets remover, or something. I'll tell more about this mani and the top coats further down!
I used Go Fast top coat on the basecolor, and after creating the blue effect on top, I used it to seal that in. Then I stamped the black rose design, and used Go Fast again. When that was dry, I used Top Satin to finish the mani.
My thoughts: Go Fast indeed does dry quite fast, and it's a thin top coat, which probably helps with that as well. The application is easy, however, you really have to be careful with nail art! Since it's so thin, it's hard to apply it floating, and that makes it easier to streak or smudge your design a bit. The top coat couldn't really smoothen the slightly bumpy blue base with just 1 coat, but the thin consistency makes it perfect for nail art with a lot of layers that you want to seal in with top coat in between, to keep the finished result thin as well. And as you'll see in a future post, it's also a nice one for stamping decals!
Top Satin does exactly what you'd expect of a matte top coat, after applying a decent layer of Top Satin, it gives a satin matte finish as shown in my pictures. It applies smooth and easy, and if you want just a touch of satin finish, you can apply a really thin coat. I like this finish, and how the top coat allows for some variation with the finished result. I always wear a normal top coat between nail art and matte top coat, to prevent the latter from smudging, and Go Fast & Top Satin made a nice team for that! You can find these top coats in various webshops and of course on the Dance Legend website.
Dance Legend Velvet #655 with OPI I Saw...U Saw...We Saw...Warsaw, A England Galahad, Essence Forever Mine, Konad Black with UberChic Beauty plate UC1-02 and Dance Legend Top Satin.
The product(s) in this post was/were send to me for review. For more information, please have a look at my Disclosure Policy.
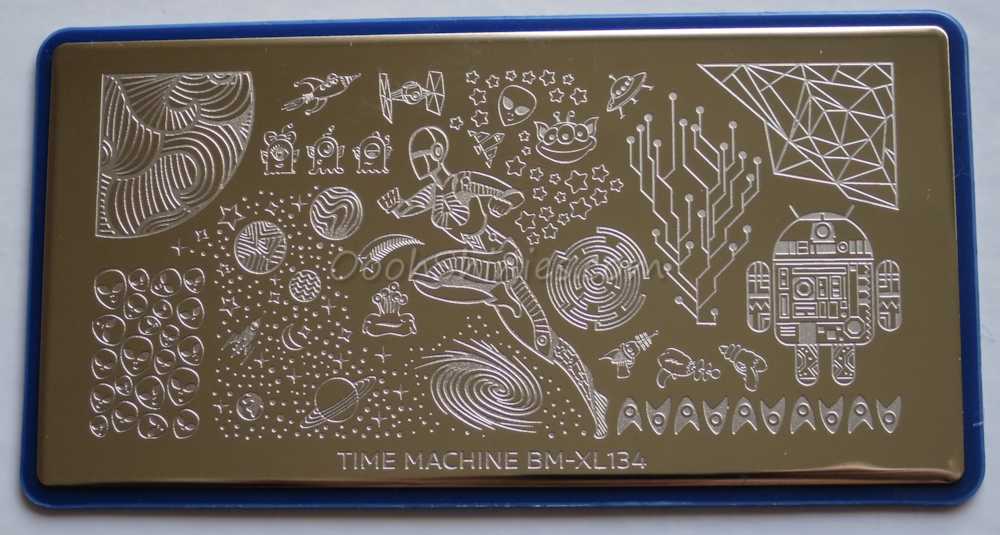
I recently received 2 of the Time Machine plates from Bundle Monster, and I went for a type of nail art that I haven't done before: negative space! I'm still undecided about the negative space nails, sometimes I think they look nice, other times not so much. Either way, it is something different than my usual stuff, that's for sure =) How about you, do you like the peep through nails?
And here are 2 plates of the Bundle Monster Time Machine set! The set has 6 plates, all filled with things you could see when using a time machine: from classic cars and a steam locomotive, celtic prints and casette tapes, all the way to the more recent 'keep calm and ..' and moustaches! The plates have matching names as well, they're called Party like 1869, Hipster Qualifications, Pop Culture Addict, Outer Space Cadet, Gilded Revolution and Prehistoria. There are plenty full nail images, but as you can see on the plates that I received, these are also great for people that like to fully create their own designs from little bits of images.
The plates all have the XL designs (1.5x2.2cm, as you can see on my comparison), and come with a sturdy rubber back and protective blue foil on the front. Needless to say -we're talking about Bundle Monster here afterall- the plates are of excellent quality. The entire plateset is part of the prize of my Bundle Monster giveaway, don't forget to enter :) You can click the images below for an enlargement.
I'm loving the bottom left image, as a whole or maybe just a stripe of it? And I think her arms will make for a nice mani too! Imagine one of those as a smaller stripe on the side of your nails. And if you want comic nails, her skirt will do the trick!
Easy mode galaxy nails, with that bigger image! Stamp it in white on your galaxy-colored sponged nails, perhaps color in some planets... The top right image can be lovely for reverse stamping (where you color in those areas), but it works nice for a messy, double stamped striped mani too ;) For today's mani I used the top left image.
This mani was easy, although I found out that stamping on your bare nails and then using top coat, easily smudges the design. So I redid them with some basecoat underneath (yeah, I'm often a basecoat slacker!), which worked well. My Konad Black was nearly empty, and Camelot was slightly too sheer, but I'm happy to say that adding some metal balls and a little Camelot to the Konad, solved that issue!
A England Camelot with BornPrettyStore studs, and basecoat stamped with Konad Black and Bundle Monster BM-XL134.
 RSS Feed
 Twitter
 07:56:00
 nhultmart




.JPG)