Thứ Tư, 19 tháng 8, 2015

Heya! Lately I've been spoiled badly with all the plates that I received, but doing those reviews also ment that I didn't get to play as much with each plate as I'd like (not complaining here, don't get me wrong, it's awesome and I feel SO honored that I got those opportunities! :)). Having foster kittens doesn't help either, but my current sweeties are doing great, and stamping decals combine nicely with kittens: I can make them in between and won't have to walk around with wet nails as much! So that's exactly what I did here, I took a plate from a set that I wanted to play more with, Bundle Monster's Shangri-La set, and made decals on my Uber Mat last night while they were sleeping. And today, during another nap, I finished the mani :)

China Glaze Aquadelic with accentnails of Konad White with Bundle Monster BM-S107 and China Glaze Aquadelic, China Glaze Fuchsia Fanatic, HEMA #840, W.I.C. by Herôme Aarhus & Yokohama


I made decals with a white stamped design and colored them in with a bunch of colors and the dual sides tools I showed recently, but the downside of so much colors is that you can end up with thicker, uneven decals. Then I thought of ridge filler, and that worked great! So instead of using a lot of top coat to even it all out, I glued the decals onto my nails with basecoat, then used just a thin layer of top coat (since I wasn't sure how ridge filler would work directly on the decals, I'll try that out some other time), then ridgefiller, then another thin layer of top coat. Because the decals were already dry, and I used a fast drying top coat, it didn't take much time at all, and the result was a lot smoother and thinner than with a couple coats of top coat!

China Glaze Aquadelic with accentnails of Konad White with Bundle Monster BM-S107 and China Glaze Aquadelic, China Glaze Fuchsia Fanatic, HEMA #840, W.I.C. by Herôme Aarhus & Yokohama

China Glaze Aquadelic with accentnails of Konad White with Bundle Monster BM-S107 and China Glaze Aquadelic, China Glaze Fuchsia Fanatic, HEMA #840, W.I.C. by Herôme Aarhus & Yokohama.

China Glaze Aquadelic with accentnails of Konad White with Bundle Monster BM-S107 and China Glaze Aquadelic, China Glaze Fuchsia Fanatic, HEMA #840, W.I.C. by Herôme Aarhus & Yokohama

Thanks for stopping by and take care :)

Thứ Bảy, 8 tháng 8, 2015

... in a land far, far away, there was a young woman named Brittany. And she brought us lots of awesome plates! Yeah, I can't say I'm feeling inspired to write a fairytale right now :P But one of UberChic Beauty's latest plates, the Fairytale plate, did inspire me! The plate is packed with fairytale related images, so let's have a look at it, see if you're getting inspired too :)

Essence Exits On Your Right with Konad Green, Essence Brazil Jungle, Catrice Run Forest Run!, China Glaze Gaga For Green and W.I.C. By Herôme Malmö, UberChic Beauty plate UC Fairytale-01 and Dance Legend Top Satin


UberChic Beauty Fairytale plate
clickable for an enlargement

This plate seems to be especially perfect for people that enjoy creating little stories on their nails, or that like skittlette manis, because you really can go nuts with all these images! Although I can appreciate a story or skittlette on someone else's nails, I usually prefer all my nails to be the same, or maybe just an accentnail here and there. (I can get a bit restless and it can feel unnatural if they ain't the same/similar and then I just want to take it all off, I suspect it's my autism that's involved there as well, but I'm slowly getting into more variation :)) Having said that, I can totally see what you could do with this plate! You could obviously start your story with the text on the top left, and use that image next to it with a path leading to a castle, and then fill the rest of your story with dragons and knights, or go for the princess route, with the top right swirly image? And I see plenty images to create a Cinderella story! You could also make a knight's armor look with the full nail image on the right, or go for a royal look with crowns, maybe in deep, matte red with shiny gold. The full nail wings on the bottom left can also be used as fire, or just as a random stripey design.

For this mani I stamped the leaves design in green on my Uber Mat, and colored them in with 4 different greens. I then applied a thin coat of the basecolor over the decals, let them dry, and applied a coat of basecolor to my nails to which I applied the decals. If you apply a decal, there's a chance that you get airbubbles underneath, and if you stick with just the clear top coat on the decal, they'll be visible through that top coat. I might have airbubbles under this mani, but because of that layer of color, they ain't visible. I think it's much more relaxed to apply the decals like that! I do notice that these decals can get a bit wobbly from all the polish, and need a few layers of top coat to give a smooth result - or just a layer of matte top coat. That way it'll look smooth without much coats ánd the design will often stand out more as well!

Essence Exits On Your Right with Konad Green, Essence Brazil Jungle, Catrice Run Forest Run!, China Glaze Gaga For Green and W.I.C. By Herôme Malmö, UberChic Beauty plate UC Fairytale-01 and Dance Legend Top Satin

Essence Exits On Your Right with Konad Green, Essence Brazil Jungle, Catrice Run Forest Run!, China Glaze Gaga For Green and W.I.C. By Herôme Malmö, UberChic Beauty plate UC Fairytale-01 and Dance Legend Top Satin.

Essence Exits On Your Right with Konad Green, Essence Brazil Jungle, Catrice Run Forest Run!, China Glaze Gaga For Green and W.I.C. By Herôme Malmö, UberChic Beauty plate UC Fairytale-01 and Dance Legend Top Satin

Do you like stories on your nails? And what do you think of this plate? Let me know what you think, and do feel free to share your manis in the comments (links are automatically marked as spam, but you can upload an image there)! :) Thanks for looking and have a wonderful weekend!


The product(s) in this post was/were send to me for review. For more information, please have a look at my Disclosure Policy.

Thứ Tư, 11 tháng 3, 2015

Morning lovelies, here's a mani that I did recently. I want to try something like this in more natural colors sometime as well, but this time I went for some shiny stamping!

W.I.C. by Herôme Malmö with Kiko 626 Lawn Green and A England Tess D'Urbervilles with Bundle Monster BM-702


I used a metallic as first stamping polish, and stamped the same image again with a more sparkly polish. Tess D'Urbervilles is a little bit sheer for stamping, but with this design I liked the variation in color that sheer stamping can give. Some bits are darker than others, which matches with leaves if you ask me, and it made the result look a bit more natural again (because metallic leaves obviously ain't the most natural thing =)).

W.I.C. by Herôme Malmö with Kiko 626 Lawn Green and A England Tess D'Urbervilles with Bundle Monster BM-702

W.I.C. by Herôme Malmö with Kiko 626 Lawn Green and A England Tess D'Urbervilles with Bundle Monster BM-702.

W.I.C. by Herôme Malmö with Kiko 626 Lawn Green and A England Tess D'Urbervilles with Bundle Monster BM-702

Hope you like it, thanks for stopping by!

Chủ Nhật, 12 tháng 10, 2014

Good morning! A little bit of sun, perfect for a little bit of holo :) Have a lovely Sunday ♥

W.I.C. By Herôme Örebro with China Glaze Strap On Your Moonboots and DRK XL Designer plate 1

W.I.C. By Herôme Örebro with China Glaze Strap On Your Moonboots and DRK XL Designer plate 1.

W.I.C. By Herôme Örebro with China Glaze Strap On Your Moonboots and DRK XL Designer plate 1

Thứ Hai, 11 tháng 8, 2014

My mum and dad have lots of beautiful flowers in their garden, and for me, the ones that are (literally as well) jumping out are huuuuge hydrangeas. This mani was inspired by those! I started with a light basecolor, then applied lots of different polishes in little dots and smudges on my placemat, dabbed in a sponge and sponged it on my nails. The result is a subtle sponged effect, and I finished it with a bit of sparkle and a matte top coat. Then I went to my parents and took these pictures :)

China Glaze Secret Peri-Wink-Le & Electric Beat, Essence Absolutely Blue & No More Drama, Catrice Lucky In Lilac, P2 Poetic, W.I.C. By Herôme Aarhus, Trind Purple Sunset, Essence Glitter Top Coat and BornPrettyStore Super Matte

China Glaze Secret Peri-Wink-Le & Electric Beat, Essence Absolutely Blue & No More Drama, Catrice Lucky In Lilac, P2 Poetic, W.I.C. By Herôme Aarhus, Trind Purple Sunset, Essence Glitter Top Coat and BornPrettyStore Super Matte.

China Glaze Secret Peri-Wink-Le & Electric Beat, Essence Absolutely Blue & No More Drama, Catrice Lucky In Lilac, P2 Poetic, W.I.C. By Herôme Aarhus, Trind Purple Sunset, Essence Glitter Top Coat and BornPrettyStore Super Matte

Here's a closer look on the sponging that shows the various colors a bit better. Could've done with less colors I'm sure, but I was doubting and decided to just use them all =) The glitter topper is just subtle silver glitter, perfect for adding a soft finishing touch, and it's a simple but lovely polish if you ask me!

China Glaze Secret Peri-Wink-Le & Electric Beat, Essence Absolutely Blue & No More Drama, Catrice Lucky In Lilac, P2 Poetic, W.I.C. By Herôme Aarhus, Trind Purple Sunset, Essence Glitter Top Coat and BornPrettyStore Super Matte

China Glaze Secret Peri-Wink-Le & Electric Beat, Essence Absolutely Blue & No More Drama, Catrice Lucky In Lilac, P2 Poetic, W.I.C. By Herôme Aarhus, Trind Purple Sunset, Essence Glitter Top Coat and BornPrettyStore Super Matte

It's been a while since I did an Inspired by... mani, and I hope you like it :) Thanks for looking!

Thứ Ba, 20 tháng 5, 2014

Morning! Messy Mansion recently released 5 new plates and Lily Anna also added a new one to the collection. I hadn't tried these brands before (I only drooled over their images), so I felt very lucky when a package from Messy Mansion landed on my doormat, allll the way from the other side of the world! :D I already showed you an image from one of them in my previous post, and here's a mani with a softer result:

W.I.C. By Herôme Örebro with Catrice Be Pool and Lily Anna 09.

Let's look at the plates! I received 3 of the new MM plates and the LA plate, they all come in a plastic cover and the front has a protective blue cover as well. There's nothing on the back of the plates, but they weren't sharp either.


Lily Anna 09 (you can click the image for an enlargement).
You can find the Lily Anna plates here, they're $10 each. I'm sure it doesn't come as a surprise that this is totally my kind of plate, loving such images! :)

Lily Anna 09

Messy Mansion plates MM33, MM37 & MM38.
Check out the whole MM series here! They're $7 each. Aren't these totally unique? Not only the plates are bigger than your average plates (please note, I don't have a real platefolder but these did not fit in my cardfolder!), look at the size of some of these images, they're huge as well! A perfect brand for girls with longer nails :)

Messy Mansion MM33

This was the plate I used for my previous mani, aren't those rockets cute? I think it's great how the MM plates that I received all have a specific subject, if you're into something, you won't end up with images of something else that you might never use!

Messy Mansion MM37

Arrr! They be some great pirate-y images for yer stash, aye! ... Yeah... I'm sorry, I couldn't resist! :D If you're into pirates, this plate is so perfect for you, it has it all!

Messy Mansion MM38

Owlllllll! (Thanks to zefrank I can't say owl anymore) Look at the size of that bottom image, woah! I like how this plate offers adorable owls in various styles, from cute to more realistic :)


W.I.C. By Herôme Örebro with Catrice Be Pool and Lily Anna 09.

W.I.C. By Herôme Örebro with Catrice Be Pool and Lily Anna 09.

W.I.C. By Herôme Örebro with Catrice Be Pool and Lily Anna 09.

The quality of these plates is great, I got nice, clean transfers on the images that I tried so far, and I don't expect anything else from the other images :) And here are these plates added to my comparison, but as you could see above, the full nail images vary a lot in size! So it's really the average of them, not all images on the plates are as big as shown here.


Thanks for looking and take care! :)


The product(s) in this post was/were send to me for review. For more information, please have a look at my Disclosure Policy.

Thứ Hai, 17 tháng 3, 2014

Morning all! I'm a bit inactive atm, busy weeks ahead! But I have some swatches ready, just need to find the time to sort through the pics :) Today I'll just show some previews instead!

___________________________________________________________

Show-Stopping Shades!


OPI Celebrates the Muppets with Limited Edition Nail Lacquers Inspired by Disney’s New Film Muppets Most Wanted

OPI announces the launch of eight new limited edition nail lacquers inspired by Disney’s Muppets Most Wanted. With an all-star cast including Kermit the Frog, Constantine, Ricky Gervais, Miss Piggy, Ty Burrell, Tina Fey and the whole Muppet gang, this family comedy is directed by James Bobin and written by Bobin and Nicholas Stoller. Muppets Most Wanted opens in theaters on March 21, 2014.
 “The Muppets are a fun-loving, colorful cast of characters. These eight new nail lacquers were inspired by their latest adventures in Disney’s Muppets Most Wanted, which include a glamorous international stage tour – and lots of surprises,” explains Suzi Weiss-Fischmann, OPI Co-Founder & Executive VP.  “Fashionable Miss Piggy is represented through soft pink, peach and pearlescent hues, as well as a frosty sapphire blue – Miss Piggy’s Big Number – to match her fabulous tour gown. The remaining four shades highlight the film’s unexpected elements and include a color-shifting mauve and three sparkle-packed lacquers – including my personal favorite Gaining Mole-mentum, a gold and rose chunky shredded glitter.”
Muppets Most Wanted by OPI includes the following shades:

Image clickable for an enlargement

Image clickable for an enlargement


Muppets World Tour
This white quartz with colorful sparkle is a global sensation.

Miss Piggy’s Big Number
Stand back… Miss Piggy’s on sapphire!

I Love Applause
This sheer, sweet pink deserves a standing ovation.

Let’s Do Anything We Want!
There’s no holding back this rose gold glitter with white confetti.

Kermit Me to Speak
Listen up… I’ve got lots to say about this rosy mauve.

Gaining Mole-mentum
Make your beauty mark with this shredded gold and chunky pink glitter.

Int’l Crime Caper
To miss this opalescent pearl would be the crime of the century.

Chillin' Like a Villain
My evil plan… to get away with this precious, sheer nude.

Muppets Most Wanted by OPI nail lacquer shades each feature OPI’s exclusive ProWide™ Brush for the ultimate in application. Muppets Most Wanted will be available March 2014, at Professional Salons, including Beauty Brands, Beauty First, Chatters, Dillard’s, jcp Salons, Pure Beauty, Regis, Trade Secret, ULTA and ulta.com for $9.00 ($10.95 CAN) suggested retail. 
For more information, please call 800-341-9999 or visit www.opi.com. Follow OPI on Twitter @OPI_PRODUCTS and become a Facebook fan!


___________________________________________________________

Image clickable for an enlargement

KOH Cocktail! will be available from April 1 in stores and on their website. The preview is in Dutch, so I'll stick to the image (I think most people prefer the images over the text anyway :))


___________________________________________________________

Image clickable for an enlargement

W.I.C. By Herôme Beautiful Barbados is another Dutch Preview, this collection should be for sale since January (I'm not sure why the press release came so late!) in stores and on their site.

Thứ Bảy, 21 tháng 12, 2013

Howdy! I've received some press releases that I didn't post yet, so here they are all together. As always, most of the images are clickable for an enlargement.

Starting this preview with W.I.C. By Herôme Frosty Norway, available in January. (€5,99)


Then we have KOH Showtime!, also available in January. (€14,99)


NYC has a collection for the holidays called Future Shock. This collection also has a golden top coat (I think it's probably another fake gold leaf top coat), but unfortunately I don't have an image of that one. It's called Top of The Gold. These polishes are called A suitcase and a Donut, Red me the news & Money never sleeps. (€2,49 for the top coat and €2,99 for the polish)


NYC also brings out 3 shiny nail art stripers, they go by the name Show Time Nail Art. (€2,49)


What do you think? Frosty Norway sure looks interesting to me! Have a great weekend! ♥

Thứ Bảy, 19 tháng 10, 2013

Evening all, just a post in between with some previews! All images are clickable for an enlargement.

_________________________________________________________

WIC by Herôme Glamorous USA will be available in November. And ohh, I think these look very promising on these images!


_________________________________________________________

KOH Paparazzi! will be available in November as well. You can use each separate, or go for a glitter on one of the basecolors. Think the left combo could be very cute :)


_________________________________________________________

MoYou-London will be adding some new plates to their Suki collection, these are up for pre sale at the moment, and will arrive in the beginning of November (just as their Comics and Mother Nature plates). I'm not sure how handy these completely full plates are, because I never tried plates like this, but I do like it when companies try out new things. Especially when it looks like this!


Thứ Bảy, 5 tháng 10, 2013

Morning everyone! As I said yesterday, I mattified the glitters that I was showing, so here's the same mani but now matte. There's just something awesome about matte glitters! I liked them shiny as well though, but this shows the individual glitters better. I think this topper will be great for sparkly tips as well, or just use the bigger glitters as an accent!

W.I.C. by Herôme Frankfurt with Essence Glorious Aquarius and Trind Matt
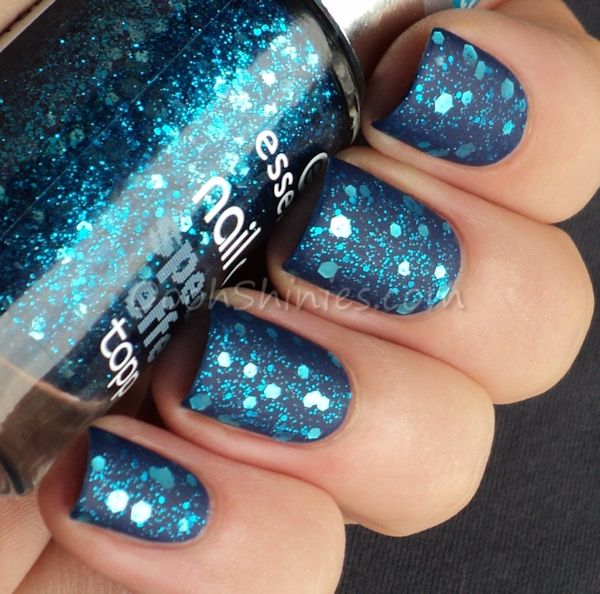
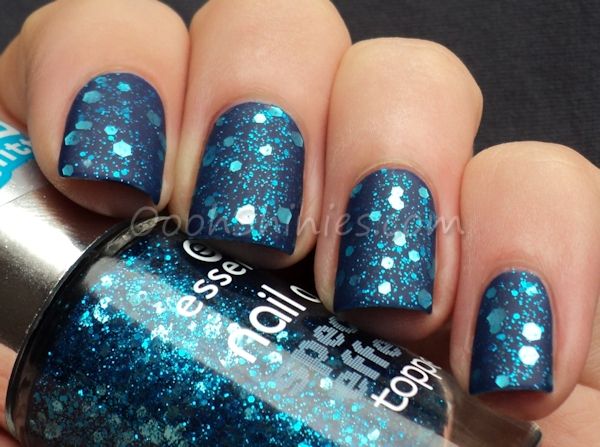
W.I.C. by Herôme Frankfurt with Essence Glorious Aquarius and Trind Matt.

W.I.C. by Herôme Frankfurt with Essence Glorious Aquarius and Trind Matt

What do you think of this Essence special effect topper, is it something you'd like to have as well?

Thanks for stopping by :)

Thứ Sáu, 4 tháng 10, 2013

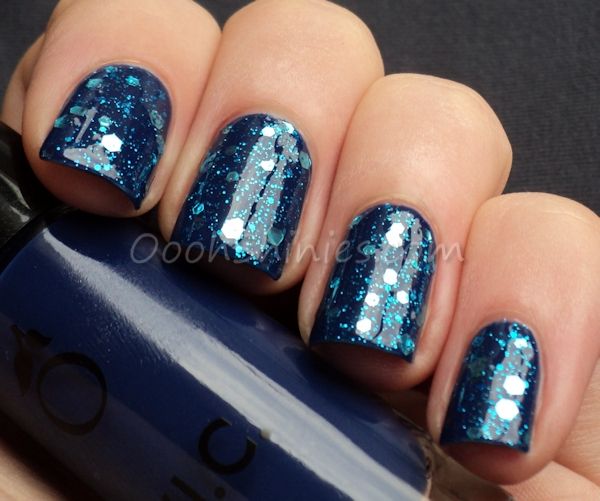
Hey all! One of the recently added Essence special effect toppers was calling out for me lately, so the other day it went home with me, and today I'm showing how it looks :) I knew straight away I wanted to wear it on a dark blue base, so that's exactly what I did:

W.I.C. by Herôme Frankfurt with Essence Glorious Aquarius

W.I.C. by Herôme Frankfurt with Essence Glorious Aquarius.

W.I.C. by Herôme Frankfurt with Essence Glorious Aquarius

Shown above is 1 coat of Glorious Aquarius on Frankfurt, finished with top coat. The finest glitter in GA applied easily, the larger ones went on as well without much fishing, but I did help them a little here and there with an orangewood stick. Sometimes Essence glitters aren't as packed as you'd expect from looking at them in the bottle, which means you'll end up fishing a lot or getting lots of the clear base on your nails as well, but luckily that wasn't the case with this one!

And yes, I of course had to mattify it, but I'll show you that next time :)

Have a great weekend! ♥

Thứ Năm, 22 tháng 8, 2013

And here's another press release, this time from a new Limited Edition from W.I.C. by Herôme called Stunning Scotland. This LE will be available in various stores and the Herôme webshop in September. The image is clickable for an enlargement.


Thứ Hai, 5 tháng 8, 2013

Hey everyone! I sometimes get questions about the products that I use, so I figured it could be nice to do a post with my favorite products and I'll add some info about my nail care routine as well :)


I always start with filing my nails, the only files that I use are glass files and a 3-step buffing file. I never clip my nails, because a clipper puts pressure on the layers of your nails and my nails don't like that at all, they chip much faster when I do clip! However, I do use a clipper to clip away so called hangnails. The glass files that I use are a fine one from Mont Blue* and a slightly coarser one from Herôme, the clipper and buffing file can be from any random brand. I don't often buff my nails, because it takes off the top layer and using it often will weaken them (and if you have ridges on your nails, you could also use a ridge filling basecoat instead!). But I always use it to smoothen out the tips of my nails after filing them. I use a remover pen (more on those further down) with water to clean under my nails if it's needed, never with anything hard. My nailbeds have grown a lot since I stopped using hard things, and usually simply washing them or cleaning them with a soft tip of a remover pen, works fine!


Next step in my routine is using a cuticle remover, which is a product that removes excess skin and softens the cuticles. I never trim my cuticles, using a remover is a lot more gentle and does the trick just fine! Quite a few brands have a cuticle remover, but I've only tried 2 of them, the Essence Fast Cuticle Remover and the Nfu.Oh Cuticle Remover. Both of these work excellent! The difference is that the Essence is more of a gel, while the Nfu.Oh is a lot more liquid, and the Essence is a lot cheaper and easier to get. I apply one of these to my cuticles, one hand at a time, and use one of these wooden sticks to remove it again. After that I wash my hands and done.
The sticks that I use are from eBay, you can buy them in stores as well, but they're so much cheaper on eBay! I payed about €1,50 for 100 of them, including shipping (search for something like nail art orange wood stick). These sticks are also ideal for nail art (I use them for marbling for example) or to apply rhinestones with the pointy side. 


Now it's time for a basecoat, I use one of these depending on what I want to wear on my nails. I'll go for the Essence Peel Off Basecoat (which is pretty much crafting glue, there's more info about it here) for glitters. For holographic polish I use Make Up Store Aqua Fix, this gives a smoother application, makes the holo a bit more visible, and I often find I need less polish with this base. Especially the last part is great when wearing one of those hard to get and/or expensive holos!
For normal polish I use Trind Nail Repair* or OPI Nail Envy. I've tried other nail hardeners or basecoats with nail hardeners as well, but some of them made my nails hurt! If you experienced that as well, a different product might work better for you too, and do use such products according to their directions.


After polishing I always use top coat, and so far there's only one top coat that I really love: Seche Vite. It's thick, dries really fast and gives that crazy shine! The downside to it? It can cause shrinkage of your polish, where the polish crawls up from your tips... and we don't want that, now do we! So to prevent that, I always apply some top coat on the tip as well, by holding my finger straight and holding the brush vertically, then swipe the edge. Then I apply it to the rest of my nail. I usually have big bottles, but received that baby bottle with an order a while ago. Nawww, isn't it adorable? :)
For matte nails, my standard top coat is the Essence Matt Top Coat. I've tried other brands as well, but this one gives the matte result that I like (some give more of a chalkboardy result, others are more satin), and this one stays well so far (I've had a few that got weird, little white flakes in it after a while that also transferred to the nail). This Essence top coat has been replaced with their Soft Touch top coat which is a special effect topper, and I think it's basically the same thing in a different bottle (and I forgot to add it to the picture, oops!). Tip: when you want to mattify your nail art, apply normal top coat first, I've noticed matte TC can easier smudge your design.
Tip: don't go fish for your top coat when your bottle is almost empty, just put it aside and start a new bottle. When that's going down as well, just place them on top of eachother and you'll end up with plenty top coat again! This of course works with other polish as well, but I seldomly have to do this with anything but top coat. I keep the empty bottles for frankening polish.


And to help polishing, especially with bottles that aren't as full anymore, I have these weird looking things that can keep the bottle at an angle! As you can see, a normal shape bottle fits, but so do the bigger bottles. These are from eBay (search for something like nail polish bottle holder). I think they are quite handy - if I remember to use them!


Especially when you mixed your top coat it can be a bit thicker than you'd like, or when any other polish gets too thick or is too gooey to apply nicely, thinner is the answer! Never use polish remover to restore your polish, it might look like it works at first, but the fact that it's made for removing already says enough, it'll destroy polish. Thinner on the other hand, just refills the stuff that's gone in your polish. Just add a few drops, roll the polish in your hands or shake it, and repeat until the consistancy is nice again. Here you can see what thinner can do for your old polish! The thinners that I have are Seche Restore (and yes, it's aaalmost empty) and P2 Nailpolish Thinner.


I don't often use quick dry products for the simple fact that Seche Vite dries so fast already, but also because these products contain some oils to moisturize your cuticles. That can be nice, but it would've been great if this stuff would come without oil too, to quickly dry layers when working on nail art without getting greasy nails! Anyway, the ones that I have are the Essence Express Dry Drops, the Herôme One Minute Dry Spray* and OPI Drip Dry. The spray is my favorite, it's so easy to apply, and more fun to use as well!


After I'm done with polishing I do a cleanup, which is using a remover pen or (slanted) brush dipped in remover to remove excess polish around your cuticles. The brush shown here is from BornPrettyStore* and works nicely, but you can use other makeup brushes as well. But unlike most bloggers that I know of, I actually prefer cleanup pens! The one shown here can be bought on eBay (search for things like nail polish remover pen or corrector pen, they often come in sets of 5).
I pour some remover in the cap of the bottle, place the cap of the pen in the bottle and dip the pen (or brush) in the remover. I swipe it off in the remover and on a cotton pad in between, and when I'm done, I pour the remover back (when the cap is filled with glitters, you can just rinse it out).
I prefer cotton pads over balls, because balls can leave little bits of it on your brush/pen. Using acetone-free remover actually seems to dry out my nails and fingers more, so I'm going for remover with acetone, and because I use so much of it, I use one of the cheapest. My standard remover is from Euro Profit Essential.


Cleanup pens come in different versions, from soft to very hard, pointy to straight and from cheap to more expensive. My favorite? The cheap ones (2nd one here)! They have the right shape and are quite hard, which I often prefer, especially when it comes to glitter polish where I find it really nice to be able to put some pressure to remove glitters.
The 1st one is also one of those cheap eBay ones, but I don't like the rounded top (the right side of it here), so when buying those I do try to look for the shape of the 2nd ones, also from eBay. The 3rd straight ones (OPI, but also HEMA and Essence) are usually quite hard as well, but the straight shape just doesn't work for me at all! The last (Essence, also Herôme) have a great shape but are a bit too soft for my liking, and they get fluffy faster. However, these are nice to clean under my nails, but then I don't use remover but water instead.
When one of the tips gets fluffy (they all do sooner or later), I just grab a new pen and use the fluffy, old pen for rough cleanup, like for the sides of my nails when I'm stamping, and use the new pen for the finer areas.


And just for giggles, the text on my pens. Mmm, nom-toxic! :D


And last, but certainly not least, the hand and nail creams! My favorite hand cream so far is the Garnier Intensive 7 Days Honey cream, it moisturizes but also gives a slightly matte look, I often use this nowadays as well before making photos. Then there's the Vaseline Hand + Stronger Nails cream, I just got this so I'm not sure yet if it actually does anything for my nails, but so far I like it, and it gets absorbed quicker than the Garnier, so easier to use when in a hurry. If I want to give my hands a little extra TLC, I apply a thicker layer of cream and use these Essence gloves and just let it sit for a while.
For my nails I have Trind Nail Balsam*. I received the balsam and the Nail Repair (shown with the basecoats) a while ago, when my nails chipped a lot, and Trind thought my nails were maybe dry. I thought it wasn't all that bad, until I applied the balsam to my nails and it was gone in the blink of an eye, lol! As you can see on the bottle, I've used it a lot and my nails really did improve, I'll definitely get it again! (update: here's a review on several Trind products, including the balsam) For my cuticles I also have OPI Avoplex Cuticle Oil To Go, which I use in periods (I'm sometimes just not in the mood to moisturize a lot! >.<). I know a lot of people love Lush Lemony Flutter, but so far these things work for me so haven't gotten it yet. But I did want to mention it, because I heard so much good things about it, so if you haven't found a cuticle product yet that works well for you, that one might be worth a try.


Right, thanks for looking at my Wall of Text, hope it was useful! What are your favorite products? :)


* = The product(s) in this post was/were send to me for review. For more information, please have a look at my Disclosure Policy.
nghe nhạc trực tuyếnNấu món chay | học nấu ăn DJ - Ảnh đẹp | xalotinnhanh